4.29.2012

Keeping It Simple – Back to Africa: Lenses

chris martin photography - lenses

At the end of Part 1 I promised this post would be about the bag. I got ahead of myself.

On last year’s trip, I took four lenses: 10-22mm, 24-105mm, 50mm, 70-200mm, plus a 1.4x TC.  These items, plus all the other stuff: body, tripod, monopod, flash, triggers, etc. were lugged along, on my person, for 10-12 hours a day, in the backpack and/or the Think Tank modular pouches.  It was heavy, uncomfortable, and little unwieldy and I looked silly for where I was.  For this trip the goal is just two bodies and two lenses.

chris martin photography - BridgeUsing Adobe Bridge filters, I looked at how I used, or if I used the collection of lenses that I took last year.  The Bridge results very interesting.  I realize that the results (left) were a function of what I took, but I still think that is good information.  I had to dig a little deeper into Bridge to see what different focal length range data looked like and then call up a trusty spreadsheet for a little analysis.  It looked to me like I could really get by with the 70-200mm and a new wide telephoto, say in the 15 or 17 to 55 or 85mm.  I never even used the 50mm prime.

Thus began hours and hours of researching a new wide telephoto. Seemingly the answer would be simple, except that a new lens was NOT the only item on my list of other items to acquire.  Add to that the wide cost and quality range of lenses in this category.   This single issue has sucked away more of my time than I even care to admit.  The only wide telephoto that I could possibly afford was going to be the Tamron SP AF 17-50mm f/2.8 XR Di II LD IF or the Sigma AF 17-70mm f/2.8-4 DC HSM OS macro.  The Canon 17-40mm F/4 L USM or Canon EF-S 17-55 f/2.8 IS = too pricey.

chris martin photography

I actually used to have the Tamron 17-50mm.  It went to Scotland with me in 2007 and did a fine job.  I sold that lens to my son and he let me borrow it yesterday to shoot around with.  While it was fun to shoot with again, there were some things that I just don’t think are going to work.
  • I had forgotten how loud the motor on that lens is.
  • In high contrast situations, it never, ever found focus.
  • IS can really come in handy in certain situations.
This is not a vacation trip where sometimes convenience can overshadow a little drop in quality.  Not to slam lenses like the Tamron, but the existing stuff is just better than the affordable alternative.

4.26.2012

Keeping It Simple - Back to Africa: Planning

chris martin photography

(This post is the first of a few to come discussing the upcoming trip to Tanzania for my company’s amazing NPO that empowers students around the world to make clean water available to every other student through the power of a playground.  For more information about the project please visit: www.WaterPowerPeace.org)

Before last year’s trip to Tanzania I spent an immeasurable number of hours trying to figure out exactly what gear to take, how to get it there and how to carry it all with me all day long.  This planning involved gear and review sites on the left monitor – and – spreadsheets for comparing items and organizing ideas on the right monitor.  I have no nearby camera store so everything has to be compared numerically and extensively reviewed.  To see everything I took last year, look back at my old Traveling With Photo Equipment post

chris martin photographyEssentially I took all my gear in Think Tank and Lowpro modular pouches, stuffed inside a Mammut Nirvana Pro (35L) technical pack.  Once on location, I swapped out the waist belt with the Think Tank belt and pulled out all the modulars.

What I didn’t like about last year's system was 1) it was too heavy for all day, every day, 2) it was too bulky to toss around, in and out of land rovers, and 3) I looked like I should have been on the sidelines of a game, not in Africa!

For this year’s trip, I really want to keep it simple!  So again, I have spent an immeasurable number of hours trying to figure out exactly what gear to take, how to get it there and how to carry it all with me all day long.


Next post: the camera bag – finally a solution!

12.16.2011

Video - High School Team Poster Photo Shoot


(Video of a high school poster session by my eldest son.)

chris martin photography - basketball poster
All Images © chris martin photography

11.03.2011

DIY DSLR Follow Focus - Rack Focus


chris martin photography - follow focus

I am always at a complete loss when shooting DSLR video and needing to easily find the focus, or zoom ring.  I grab the wrong one or miss it completely and end up with noise and movement in the final shot.  What I needed was a follow focus ring that attaches to the lens.  These things make it as quick and simple as possible to rotate that focus ring while shooting.

A little internet research will provide a plethora of DIY solutions.  The one I liked the best was an idea presented by knoptop here.  It uses silicon jar openers.  The only problem was that the recommended vendor no longer carried these things.  I am not a patient person so upon learning that I couldn’t run out a grab a few, I went to work thinking of what I could use that was laying around here.

Enter the filter wrench (Adorama: small - big, B&H: small - big).  I have a bunch of these in different sizes.  So I tried a few.  They work great!  If you have followed at least my recent posts you will know that two criteria must be met for new gear and accessories and using existing filter wrenches perfectly met all the criteria – no added bulk or weight and it didn’t cost me a thing.

I eventually found the jar openers at Target and bought all they had left.  In practice I use a variety of combinations of both the jar opener and the filter wrench.  Sometimes I need a rubber band around the top of the filter wrench, but that doesn’t affect its function at all.

DIY DSLR Video Stabilizer – Mash Up


chris martin photography - stabilizer /></div>
<br />
<br />
<div class= 

Somewhere previously I mentioned that I had made the jump into DSLR video, with my employer’s purchase of a beautiful Canon 7D.  It was only a matter of minutes afterward that I was looking for accessories to help me get the best material I could with this new body.

There are two important factors that are always considered and weigh heavily on all of my new gear acquisitions:
  1. When I shoot for work, I am traveling on planes to get to sites and once on location I am carrying everything that I brought, day long.  So, it has to be something I really need or can use in a variety of beneficial ways AND it can’t add very much to the existing travel kit.
  2. Money is as hard for me to squeeze out for new gear as the next guy, so if I can make something from stuff I have on hand; it is a win-win!
I have been shooting video with my old Canon Optura 20 for years and have used the great idea I saw on a Scott Kelby blog post: “It’s Guest Blog Wednesday featuring AaronGreene”.  In Aaron’s words, “I rigged a super clamp at the bottom of my collapsed monopod as a sort of steady cam. I’d hold the monopod with my right hand and pull focus with the left letting the clamp act as a weight about 18 inches below the camera... If you have a monopod and a super clamp, try it out! It should help you make smoother movements.”

This has been a great suggestion that I have used for years.  I always have a monopod and a Manfrotto superclamp with me on location.  While superclamps are heavy, they aren’t that big and I have needed one on almost every trip.  So, both of the above criteria were met and it was a perfect solution.

While looking around at other stabilizing rigs on the net that are out there for DSLR video, I ran into the “$14 Stabilizer”. I thought it was interesting and very much liked the horizontal handle, thus getting both hands off the camera body.  Building one of these was breaking rule #1 above though as it was just more stuff and weight to be dragging along with me.


The solution was to peruse all of the Manfrotto accessories that are available for superclamps.  Enter the Manfrotto 042 Extension Arm (Adorama, B&H).  Add another superclamp (why wouldn’t anyone want to do that) and you have what for me is the perfect stabilizer.  Criteria #1 was met and well, half of criteria #2 was met as I did have to spend a little cash. 

10.21.2011

Sometimes Give it Away!


It certainly feels good and I wish I could be there when the mail arrives in a few days.

A very wise mentor of mine has had an extremely rich and full photographic career for over 67 years.  He has traveled the world shooting nearly everything imaginable, often people and events typically not open to the photographic community.  Doors are opened as relationships are created.  Part of culturing the relationships is offering and following through with sending some prints back after they are developed and processed.  The offer to send photos is extended and they are actually sent.  Days, months or even years later when access is then again requested, the doors are open and remain open as the process is repeated.  

On a recent trip to visit and spend time with him, we were able to spend the day shooting a culture rarely open to photographers.   We were granted such access because of the relationships he has formed over his long career.

I, and maybe even you, I’m sure have wanted a shot of a stranger and offered to send them a print if they will allow you to take their picture.  I’ve said it and then later, for whatever reason, haven’t followed through.  Maybe I wasn’t happy with the photo, I just got too busy or maybe I forgot.  Whatever the reason, it really doesn’t matter.  This lack of ethics simply doesn’t cut it with my mentor.

As we were driving back from our day of shooting and talking, he urged me to stop along the lake we were bordering to get a few shots of the fall colors.  Twice, I pulled the car over, neither time liking the perspective.  On the third try I saw a dock that would be perfect.  I grabbed my gear and headed down to the water.  Immediately upon my arrival at the dock the family that was there fishing erupted into a chorus of hooping , hollering and cheering.  The youngest member of the group had just bagged her very first fish.

The spirit of my mentor, who was resting up in the car, flooded into me and my normally very shy self races up and says “let me grab a few shots and I WILL SEND YOU THE PICTURES.”  Of course I looked around to see who was speaking and it was in fact me!

I grabbed a few photos, exchanged mailing information and then heard the whole story about this contemporary American family - turns out this was a pretty big deal for them.

It pleases me very much to say that yesterday I mailed some 5x7s and an 8x10 of her “first fish”.

8.17.2011

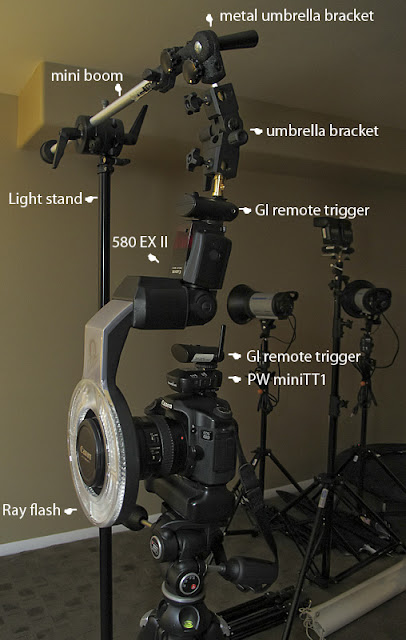
DIY – Ray Flash and PW miniTT1 Setup

chris martin photography-DIY Rayflash setup

[Inspiration for my setup came from a Photozo post here.]

You cannot use the Ray Flash as intended when you also have a Pocket Wizard miniTT1 on the hotshoe.  DIY fix:
  • Camera on tripod
  • PW miniTT1 on the camera hotshoe
  • GI transmitter on the PW miniTT1 hotshoe – which now works thanks to the recent miniTT1 firmware update
  • Sturdy light stand with mini-boom (fully collapsed and parallel to the ground)
  • An old metal umbrella bracket attached to the mini-boom
  • A new, common umbrella bracket attached to the metal umbrella bracket (this gives me lots of adjustment flexibility without relying on the mini-boom which wants to rotate due to the weight)
  • GI trigger attached with a stud to the common umbrella bracket
  • 580 EX II in the GI trigger hotshoe
  • Ray Flash mounted upside down to the 580 EX II
A little troublesome to move around!.

4.09.2011

DIY – Tri Flash Bracket

NOTE: Not claiming to be the inventor of this idea!

I do not recommend using this with an inexpensive, hollow tube umbrella.  Although having a flash on each side does provide nice balance, you still have to tighten it down a little hard.  Second, it is a little unwieldy to get set up, but I will admit that it never budged during the hour long session.

chris martin photography - triFlash

chris martin photography - triFlash

Details:
  • Umbrella bracket #1 – set up normally, with one flash on top.
  • Umbrella bracket #2 – a flash on each end.
  • The umbrella goes through its normal hole in the dual flash bracket, then continues on to through the hole in the bracket mounted on the light stand.  Adjust the angle of the dual flash bracket as needed to get the best full coverage you can.
chris martin photography - triFlash

3.30.2011

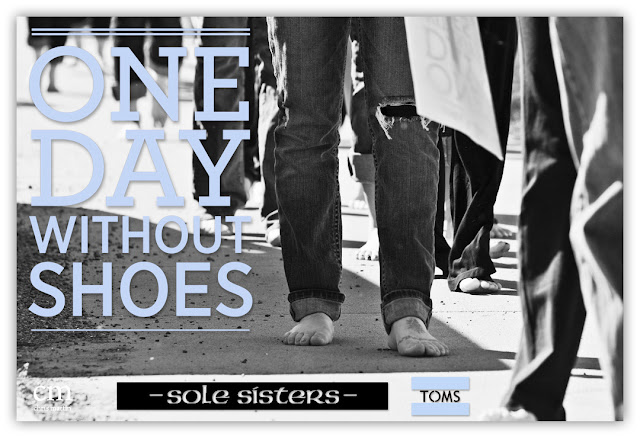
TOMS - One Day Without Shoes

chris martin photography - TOMS

chris martin photography - TOMSchris martin photography - TOMS

chris martin photography - TOMS

Please support your local event: ONE DAY WITHOUT SHOES

3.19.2011

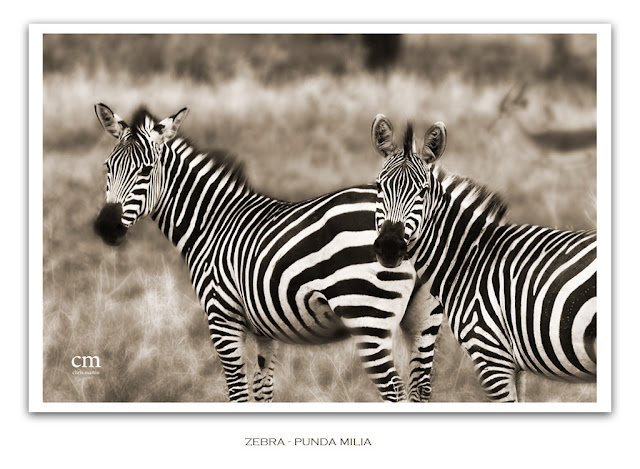
Tanzanian Animals

Here are a couple of shoots of indigenous critters from the trip, found at the Tarangire National Park - complete with their Swahili names.
chris martin photography - Tanzania

Processing: single image HDR, Gaussian blur + fade, mask critter, levels on background only, b&w, curves, hue/saturation